动机
由于jsbsim中的某些函数总是打印出一些烦人的文本,同时为了方便改写多进程代码,需要去了解该外部库的底层原理。
创建一个自己的库
学习别人的库最好的方式先打造一个自己的库,看看需要用到什么东西。
pip install是在PyPI仓库中下载软件包,所以创建自己的库需要发布到这个仓库中。
首先创建一个项目,项目的目录结构如下
├── yourtool_name              目录
│   └── db                 目录
│       ├── __init__.py
│       └── your_code.py     工具类
├── requirements.txt     依赖库
├── setup.py             安装脚本
├── README.md          说明文档
├── upload_pypi.sh       上传到官方PyPI仓库脚本
├── upload_pypi_test.sh 上传到官方测试PyPI仓库脚本在your_code编写你的pyhton代码尽量采用PEP规范。比如下面定义了一个类。
class your_class:
    def __init__(self):
pass然后为了import方便,在__init__.py中将对外部暴露的报名规范
from .db.your_code import your_class测试结果没问题后,编写发布库setup.py文件。(其中用到了setuptools后面介绍)
import setuptools
import re
import requests
from bs4 import BeautifulSoup

package_name = "yourtool_name"


def curr_version():
    # 方法1:通过文件临时存储版本号
    # with open('VERSION') as f:
    #     version_str = f.read()

    # 方法2:从官网获取版本号
    url = f"https://pypi.org/project/{package_name}/"
    response = requests.get(url)
    soup = BeautifulSoup(response.content, "html.parser")
    latest_version = soup.select_one(".release__version").text.strip()
    return str(latest_version)


def get_version():
    # 从版本号字符串中提取三个数字并将它们转换为整数类型
    match = re.search(r"(\d+)\.(\d+)\.(\d+)", curr_version())
    major = int(match.group(1))
    minor = int(match.group(2))
    patch = int(match.group(3))

    # 对三个数字进行加一操作
    patch += 1
    if patch > 9:
        patch = 0
        minor += 1
        if minor > 9:
            minor = 0
            major += 1
    new_version_str = f"{major}.{minor}.{patch}"
    return new_version_str


def upload():
    with open("README.md", "r") as fh:
        long_description = fh.read()
    with open('requirements.txt') as f:
        required = f.read().splitlines()

    setuptools.setup(
        name=package_name,
        version=get_version(),
        author="Author's name",  # 作者名称
        author_email="xxxxxxx@163.com", # 作者邮箱
        description="Python helper tools", # 库描述
        long_description=long_description,
        long_description_content_type="text/markdown",
        url="https://pypi.org/project/yourtools/", # 库的官方地址
        packages=setuptools.find_packages(), #包含的所有py文件
        data_files=["requirements.txt"], # yourtools库依赖的其他库
        classifiers=[
            "Programming Language :: Python :: 3",
            "License :: OSI Approved :: MIT License",
            "Operating System :: OS Independent",
        ],
        python_requires='>=3.6',
        install_requires=required,
    )


def write_now_version():
    print("Current VERSION:", get_version())
    with open("VERSION", "w") as version_f:
        version_f.write(get_version())


def main():
    try:
        upload()
        print("Upload success , Current VERSION:", curr_version())
    except Exception as e:
        raise Exception("Upload package error", e)


if __name__ == '__main__':
main()正式发布之前,建议先把库发布到PyPI的测试环境:https://test.pypi.org,编写发布测试脚本upload_pypi_test.sh
#!/bin/zsh

rm -rf ./build
rm -rf ./dist
rm -rf ./yourtools.egg-info

python3 setup.py sdist bdist_wheel #打包

python3 -m twine upload --repository-url https://test.pypi.org/legacy/ dist/* #发布在测试环境中的库可以通过下面命令进行测试:pip install -i https://test.pypi.org/simple/yourtools
测试没问题后,编写发布脚本upload_pypi.sh
#!/bin/bash

# Upload project to pypi

rm -rf ./build
rm -rf ./dist
rm -rf ./yourtools.egg-info

python3 setup.py sdist bdist_wheel #打包成wheel库

python3 -m twine upload dist/*
setuptools
在前面的步骤可以看到很重要的步骤就是用setuptools将所有文件打包,这里介绍一些打包步骤。
- 安装:
sudo apt-get install python-setuptools - 使用:在文件中编写一个setup.py
from setuptools import setup, find_packages
setup(
    name = "demo",
    version = "0.1",
    packages = find_packages(),
)
待补充…
jsb目录结构

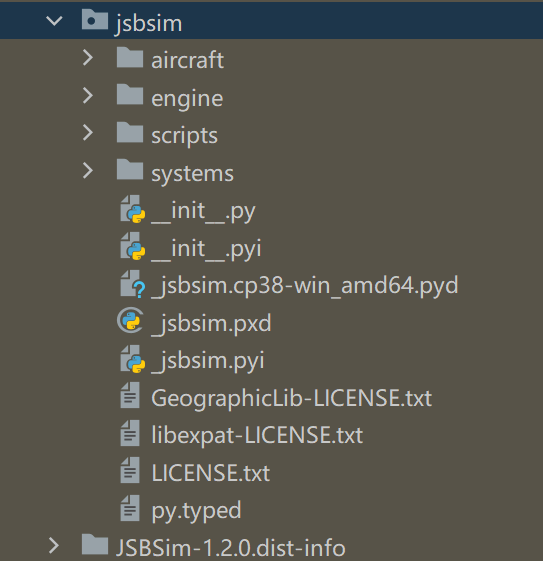
比较重要文件树如下
其中:
- jsbsim.py为jsbsim库的入口文件,通过这个文件可以调用jsbsim库中的所有功能。
- __init__.py:由 Cython 编程语言 “编写” 而成的 Python 扩展模块头文件。.pxd 文件类似于 C 语言的 .h 头文件,.pxd 文件中有 Cython 模块要包含的 Cython 声明 (或代码段)。
- _jsbsim.pxd:jsbsim库的Cython文件,通过这个文件可以将jsbsim库中的C++代码转换为Python代码。
- _jsbsim.c:jsbsim库的C文件,通过这个文件可以将jsbsim库中的C++代码转换为C代码。
init.py
首先看文件__init__.py
其内容如下:
from ._jsbsim import (
    __version__,
    BaseError,
    FGAerodynamics,
    FGAircraft,
    FGAtmosphere,
    FGAuxiliary,
    FGEngine,
    FGFDMExec,
    FGGroundReactions,
    FGJSBBase,
    FGLGear,
    FGLinearization,
    FGMassBalance,
    FGPropagate,
    FGPropertyManager,
    FGPropertyNode,
    FGPropulsion,
    GeographicError,
    TrimFailureError,
    ePressure,
    eTemperature,
    get_default_root_dir,
)
__init__.py文件中导入了jsbsim库中的所有模块,因此可以直接使用这些模块中的函数。
_jsbsim.pxd
采用cpython编写,主要是引入C++代码中的各个类和函数
#从C++标准库中导入常见类型
from libcpp cimport bool
from libcpp.string cimport string
from libcpp.memory cimport shared_ptr
from libcpp.vector cimport vector
from cpython.ref cimport PyObject
#从ExceptionManagement.h文件中导入base_error对象指针或函数
cdef extern from "ExceptionManagement.h":
    cdef PyObject* base_error
    cdef PyObject* trimfailure_error
    cdef PyObject* geographic_error
    cdef void convertJSBSimToPyExc()
#从initialization/FGInitialCondition.h文件中将JSBSim::FGInitialCondition命名为c_FGInitialCondition
cdef extern from "initialization/FGInitialCondition.h" namespace "JSBSim":
    cdef cppclass c_FGInitialCondition "JSBSim::FGInitialCondition":
        c_FGInitialCondition(c_FGInitialCondition* ic)
        bool Load(const c_SGPath& rstfile, bool useAircraftPath)
_jsbsim.cp32-win_amd64.pyd
该文件为python的动态加载文件,通过python的工具将C代码编译成二进制形式,从而提升python程序性能。所以前面的_jsbsim.pxd导入的类和函数都来源于这里。
github源码
由于采用了动态加载文件的形式无法看到其内部源码,所以去其官网查看其具体的代码。
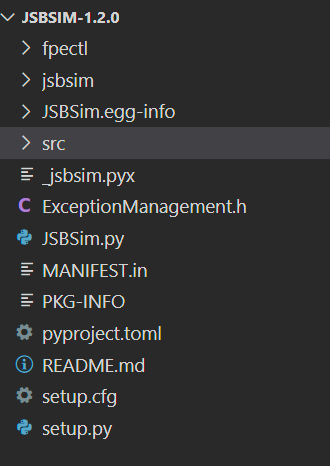
去PyPI中下载其源代码。其文件目录为

在src目录中能够找到相应的C++目录
通过全局搜索找到了烦人文本出现的代码段
bool FGEngine::Load(FGFDMExec *exec, Element *engine_element)
{
  Element* parent_element = engine_element->GetParent();
  Element* local_element;
  FGColumnVector3 location, orientation;

  auto PropertyManager = exec->GetPropertyManager();

  Name = engine_element->GetAttributeValue("name");

  // Call ModelFunctions loader
  FGModelFunctions::Load(engine_element, exec, to_string((int)EngineNumber));

  // If engine location and/or orientation is supplied issue a warning since they
  // are ignored. What counts is the location and orientation of the thruster.
  local_element = parent_element->FindElement("location");
  if (local_element)
    cerr << local_element->ReadFrom()
         << "Engine location ignored, only thruster location is used." << endl;

  local_element = parent_element->FindElement("orient");
  if (local_element)
    cerr << local_element->ReadFrom()
         << "Engine orientation ignored, only thruster orientation is used." << endl;

  // Load thruster
  local_element = parent_element->FindElement("thruster");
  if (local_element) {
    try {
      LoadThruster(exec, local_element);
    } catch (std::string& str) {
      throw("Error loading engine " + Name + ". " + str);
    }
  } else {
    cerr << "No thruster definition supplied with engine definition." << endl;
  }

  ResetToIC(); // initialize dynamic terms

  // Load feed tank[s] references
  local_element = parent_element->FindElement("feed");
  while (local_element) {
    int tankID = (int)local_element->GetDataAsNumber();
    SourceTanks.push_back(tankID);
    local_element = parent_element->FindNextElement("feed");
  }

  string property_name, base_property_name;
  base_property_name = CreateIndexedPropertyName("propulsion/engine", EngineNumber);

  property_name = base_property_name + "/set-running";
  PropertyManager->Tie( property_name.c_str(), this, &FGEngine::GetRunning, &FGEngine::SetRunning );
  property_name = base_property_name + "/thrust-lbs";
  PropertyManager->Tie( property_name.c_str(), Thruster, &FGThruster::GetThrust);
  property_name = base_property_name + "/fuel-flow-rate-pps";
  PropertyManager->Tie( property_name.c_str(), this, &FGEngine::GetFuelFlowRate);
  property_name = base_property_name + "/fuel-flow-rate-gph";
  PropertyManager->Tie( property_name.c_str(), this, &FGEngine::GetFuelFlowRateGPH);
  property_name = base_property_name + "/fuel-used-lbs";
  PropertyManager->Tie( property_name.c_str(), this, &FGEngine::GetFuelUsedLbs);

  PostLoad(engine_element, exec, to_string((int)EngineNumber));

  Debug(0);

  return true;
}


